TL;DR — Use Codex CLI to wire OpenAI Image-2 into Claude Code, no OpenAI API key needed, and saying “generate an image” drops the image straight into
./images/. The Claude Code terminal version and the Claude App / Cowork version each have a Skill you can download and use directly.
Lately I’ve been spending almost all day inside Claude Code.
Writing articles, breaking down tasks, organizing assets, editing code, generating prompts—most of my work can be done within the same Claude window.
But there’s one thing that suddenly breaks the flow: image generation.
I also have a ChatGPT / OpenAI account, and OpenAI’s image generation capabilities are excellent. The problem is that every time I want to generate an image, I usually have to switch to the ChatGPT web app, paste the prompt, wait for the image, download it, and then move the file back into the project folder.
None of these steps are hard, but they’re annoying.
So I wanted to do something very lazy:
Could I just say “generate an image for me” inside Claude Code, and have it call Codex CLI to run OpenAI Image-2 using my ChatGPT account, and finally save the image straight into the current project’s ./images/?
The answer is: yes.
This article is the complete method.
If you’re just getting hooked on Claude Code, this article will help you grasp one thing: the truly useful part of AI tools isn’t any single capability, but whether you can wire them into a workflow that doesn’t break.
This article is especially for you if you:
- Are just getting hooked on Claude Code
- Also have a ChatGPT or OpenAI account
- Often need to drop image assets into articles, slides, product mockups, or project folders
- Don’t want to switch to the ChatGPT web app every time you generate an image
- Want to start chaining AI tools into your own workflow, rather than using them as one-off points
If you don’t touch the CLI at all, or only occasionally generate an image, just use the ChatGPT web app. The value of this article lies in turning image generation into a workflow that’s repeatable, batchable, and packageable as a Skill.
First, let’s translate a few terms into plain language
| Term | You can understand it like this for now |
|---|---|
| Claude Code | Claude’s developer working environment, which can help you read files, write files, and run commands inside a project folder |
| Codex CLI | OpenAI’s local command-line tool, which you can log into with your ChatGPT account to bring OpenAI’s capabilities into your terminal |
| Image-2 | OpenAI’s image generation model, used here to produce images; the model name in the API docs is gpt-image-2 |
| Skill | A fixed set of work instructions for Claude, so it knows what to do when it encounters a certain kind of request |
| MCP | A bridge that lets the Claude desktop App call local capabilities |
| Cowork | An interface in the Claude desktop App that’s closer to “working together,” capable of producing files and outputs |
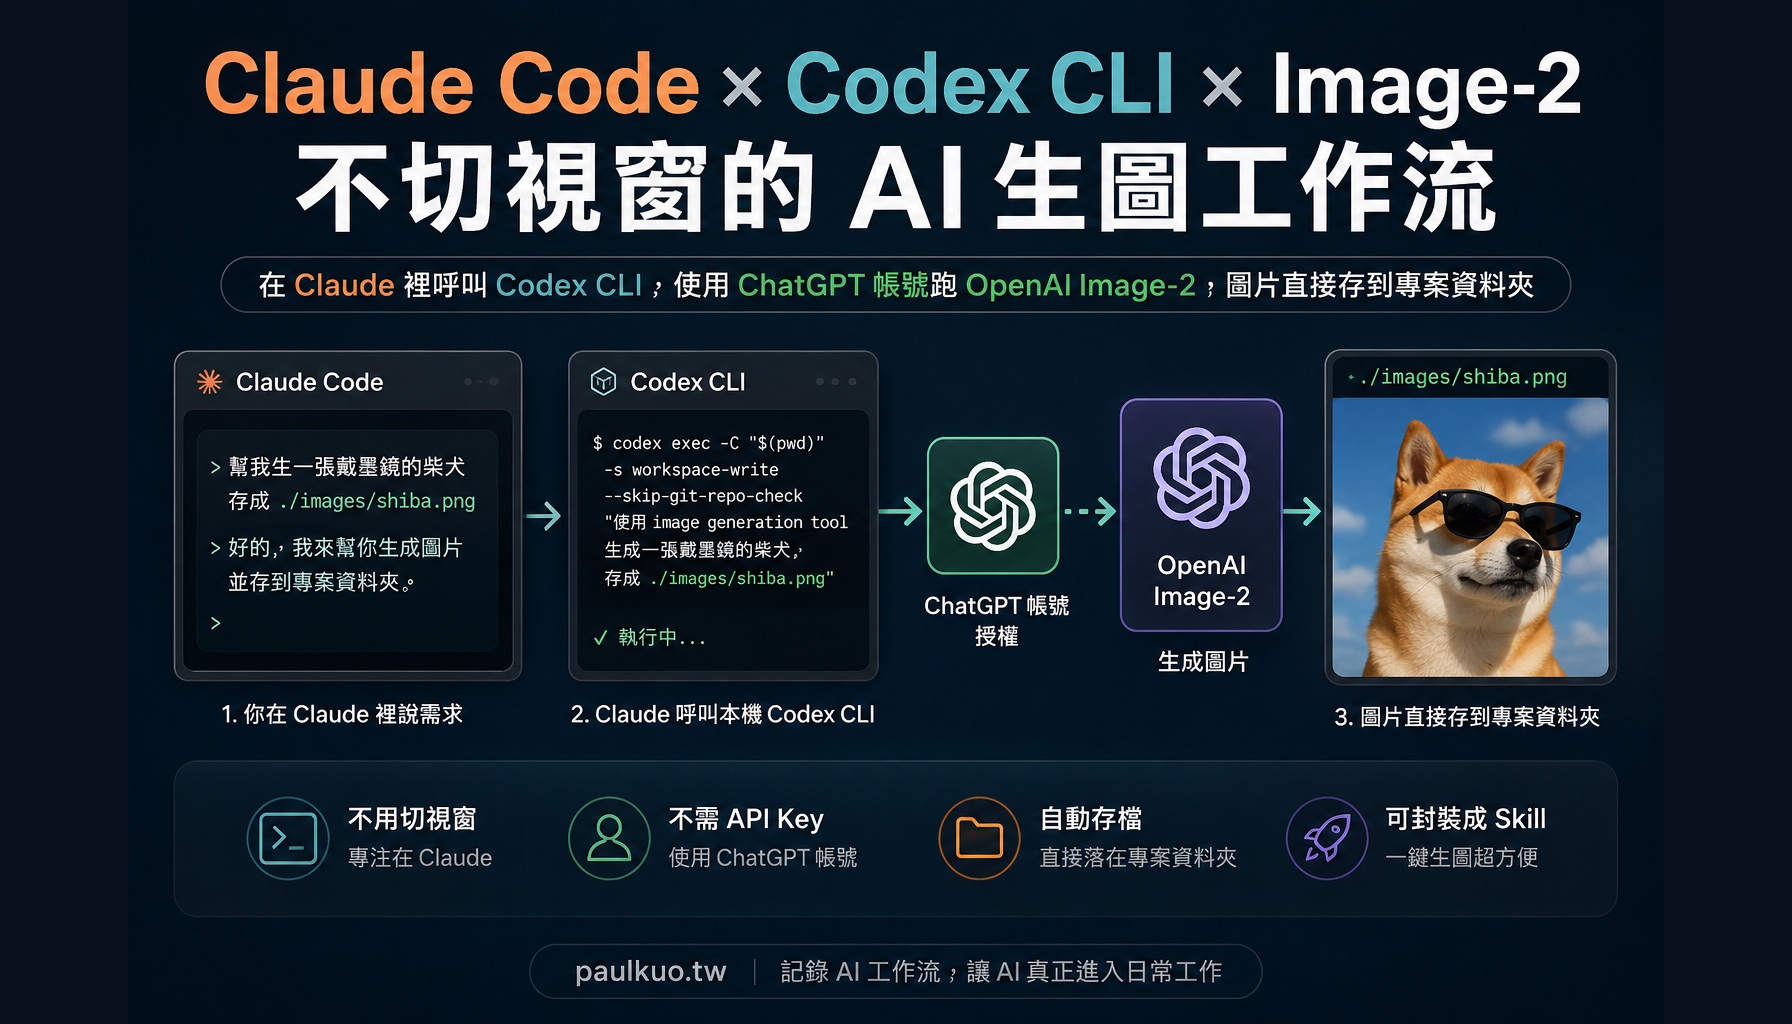
The end result you’ll get
Inside Claude Code, you can say:
Generate a Shiba Inu wearing sunglasses for me, save it as
./images/shiba.png
Claude will organize the prompt for you and call the local Codex CLI. Codex CLI will use your ChatGPT account to call OpenAI Image-2, and finally save the image into the project folder.
The whole process needs no opening of the ChatGPT web app, no manual downloading of images, and no separate OpenAI API key.
How does this workflow run?
The main line is simple:
You state a request inside Claude
→ Claude organizes the prompt
→ Codex CLI executes
→ ChatGPT account authorizes
→ Image-2 generates the image
→ PNG saved to ./images/
No matter which interface you’re used to working in, it all converges onto the same OpenAI chain in the end:
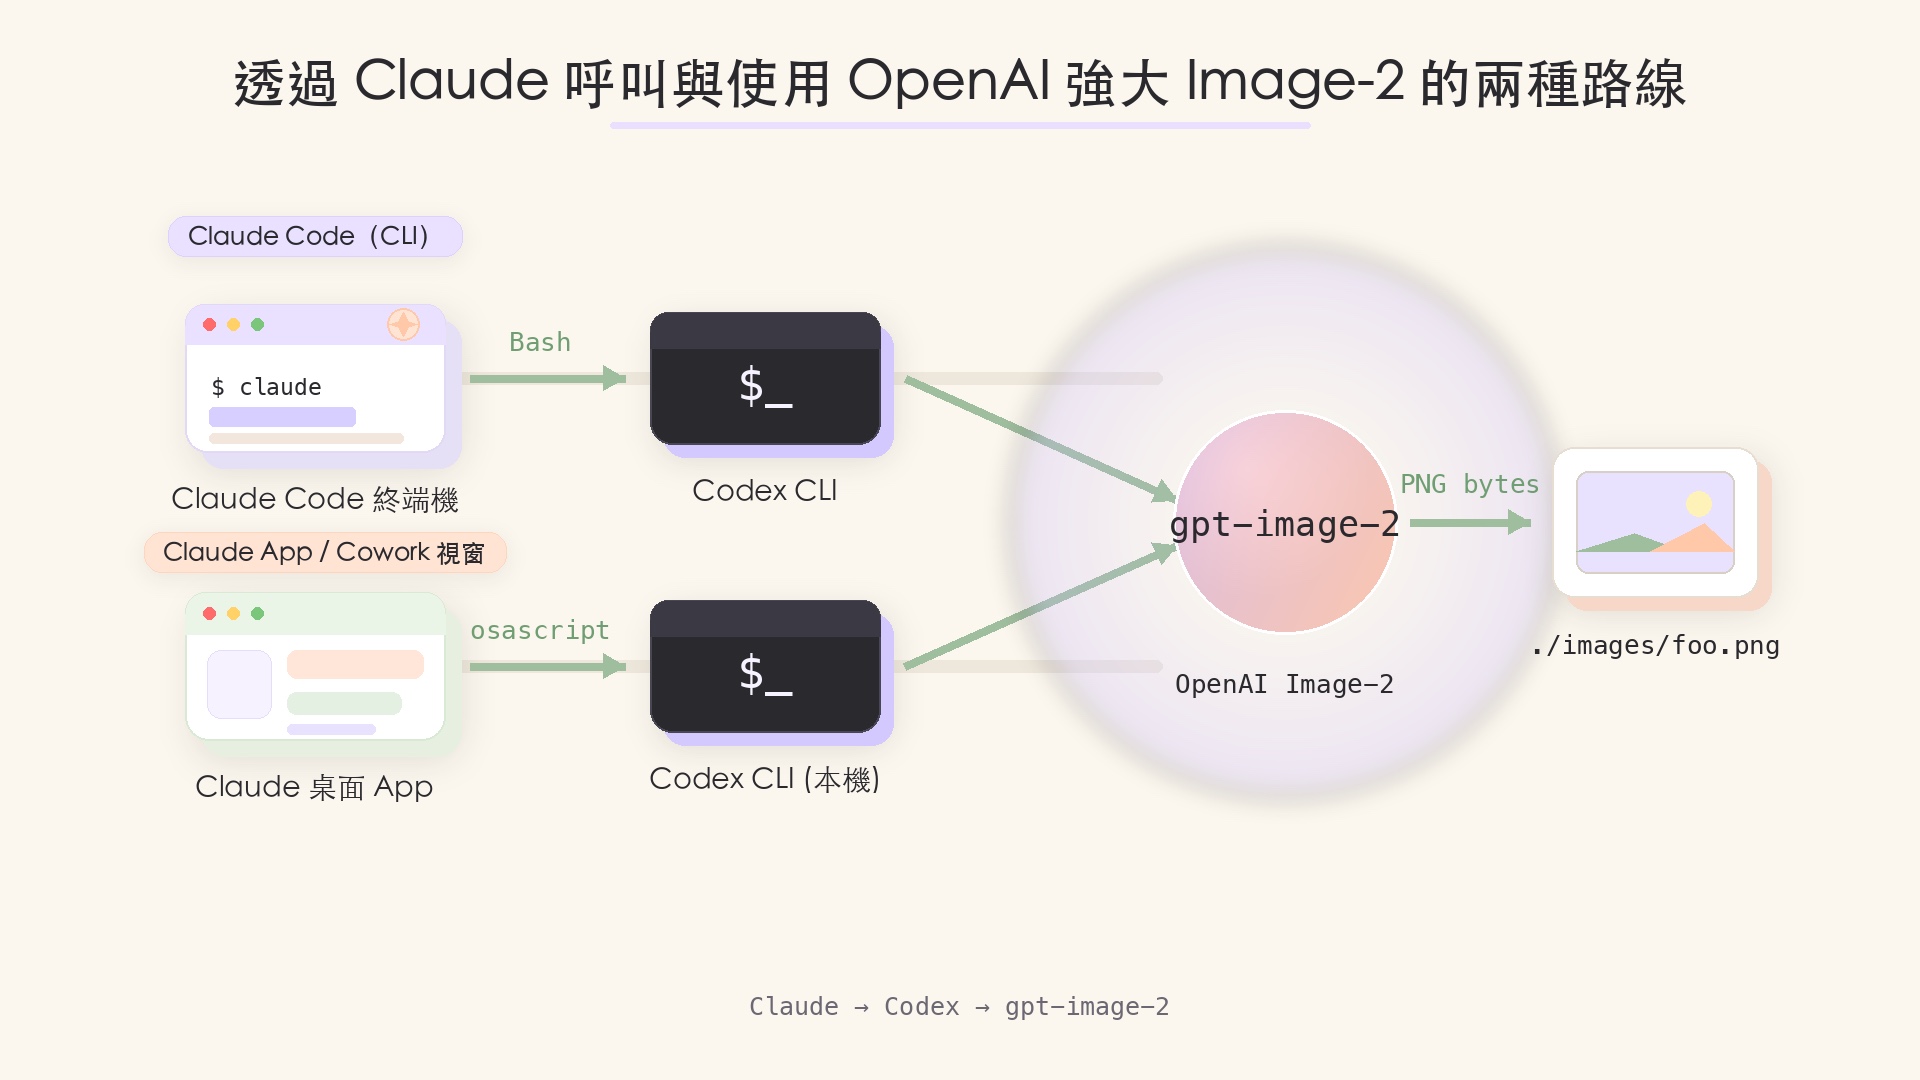
The only difference between the two paths is how Claude gets your local codex to run.
Claude Code can run Bash natively, so it calls it directly. For the Claude App / Cowork to touch local commands, it needs the “Control your Mac” MCP as a bridge. From there on it’s all the same—Codex authenticates with the ChatGPT account, calls Image-2 to produce the image, and the image drops into the specified path.
flowchart LR
    U([User]) -->|"'Generate a Shiba Inu'"| D{Which interface?}
    D -->|Claude Code terminal| S1[gen-image-cli<br/>Skill]
    D -->|Claude App / Cowork window| S2[gen-image-app<br/>Skill]
    S1 -->|Bash direct call| CX[Codex CLI 0.125+<br/>local]
    S2 -->|Control your Mac MCP<br/>osascript asks local to run| CX
    CX -->|ChatGPT account auth| TOOL[image_gen.imagegen]
    TOOL -->|calls behind the scenes| GPT[(OpenAI Image-2<br/>gpt-image-2)]
    GPT -->|PNG bytes| F[./images/foo.png]
    F -->|"CLI: drops into project folder<br/>App: auto-returns to Cowork outputs"| U
What do you need to prepare first?
1. Install Codex CLI
Choose either of the two installation methods:
# npm version (works cross-platform)
npm i -g @openai/codex

# or Homebrew (macOS)
brew install --cask codex
2. Log into Codex with your ChatGPT account
codex login                # opens a browser to guide you through authorizing with your ChatGPT account
codex login status         # should show Logged in using ChatGPT
3. Confirm your account can use image generation
This route goes through ChatGPT account authorization, not an OpenAI API key.
According to the official OpenAI announcement, all ChatGPT and Codex users can use image generation:
| Account / Plan | Can use it | Notes |
|---|---|---|
| Free ChatGPT | ✅ Yes | Basic image generation capability |
| ChatGPT Plus / Pro / Business | ✅ Yes | Quality, controllability, and complex-scene handling are usually better |
| OpenAI API | ✅ Yes | But this is a different path, going through API key and token-based billing |
The key point: you don’t necessarily have to pay for Plus to run this integration. Free accounts work too; the only difference is output quality.
4. If you want to use it in Claude App / Cowork, also install the Control your Mac MCP
Pure Claude Code terminal users can skip this step—Bash can run codex directly.
If you want to say “generate an image” directly in the Claude desktop App’s Chat / Cowork window, you’ll need this MCP so Claude can call your local codex.
Go to k6l3/osascript-dxt (GitHub) to download the .mcpb file, and double-click to install it into the Claude desktop App. The first call will trigger a macOS automation permission request—click allow.
Minimum viable version: just run it once first
If you just want to first confirm this actually works, there’s no rush to wrap a Skill.
The minimal flow is just three steps:
- Install Codex CLI
- Run
codex login - In your project folder, run:
mkdir -p ./images

codex exec -C "$(pwd)" -s workspace-write \
  --skip-git-repo-check \
  "Please use the image generation tool to generate a Shiba Inu wearing sunglasses, save it as ./images/shiba.png"
If it succeeds, you’ll see under your current project:
./images/shiba.pngGet this step working first, then wrap the Skill. Don’t mix Codex CLI, Skill, MCP, and Cowork all together from the start, or you won’t know which layer the problem is in.
What the actual output looks like
After about 1 minute of running, I got a 1254×1254 PNG of around 2 MB:

Image: A test image generated by calling Codex CLI through Claude Code, then through OpenAI Image-2. The point isn’t the Shiba Inu, but that the image drops straight into ./images/shiba.png—the whole process involved no opening a browser, no pasting a prompt into the web app, and no manual downloading.
Two pitfalls I stepped into
Pitfall 1: First Codex run blocked by .codex permissions
If you see:
Failed to create session: Operation not permittedit’s usually that ~/.codex has the wrong permissions. Run this to fix it:
sudo chown -R $(whoami) ~/.codexThen run it again.
Pitfall 2: The image doesn’t appear in the folder you expected
-C "$(pwd)" means: have Codex use “the folder you’re in at the moment you run the command” as the working directory.
So you must first:
cd your-project-folderbefore running codex exec.
Otherwise the image might be saved to home, Downloads, or some other location you didn’t expect.
Wrapping it as a Skill: from then on just say “generate an image”
The codex exec above can be run manually, but typing that long string every time is tiring.
So I wrapped it into two Claude Skills:
| Where you use Claude | Which Skill to use | Need MCP? |
|---|---|---|
| Claude Code terminal | gen-image-cli | No |
| Claude desktop App / Cowork | gen-image-app | Yes, Control your Mac MCP |
Claude Code users: use the CLI version first
If you mainly work inside Claude Code, things are simplest. Claude Code can run Bash natively, so gen-image-cli can call the local codex directly, with no extra setup.
Claude App / Cowork users: then look at the App version
If you want to say “generate an image” directly in the Claude desktop App or Cowork window, you’ll need one more layer of bridge: the Control your Mac MCP.
Because the Claude App can’t run terminal commands directly like Claude Code can, it has to ask your Mac to help execute codex via MCP / osascript.
Download and install
📦 Download: gen-image-skills.zip
mkdir -p ~/.claude/skills && unzip -o ~/Downloads/gen-image-skills.zip -d ~/.claude/skills/Once installed, you can say “generate a capybara wearing a hat” in any interface, and Claude will automatically pick the corresponding Skill based on the tools currently available.
If you want to hand-craft the CLI version’s ~/.claude/skills/gen-image-cli/SKILL.md yourself, the core content is like this:
---
name: gen-image-cli
description: Inside Claude Code (CLI), call the local Codex CLI via Bash to generate images (backed by OpenAI Image-2, API model gpt-image-2), saved into ./images/ of the current working directory. Trigger words: 生圖, 畫一張, 來張圖, generate image.
allowed-tools: Bash(codex:*) Bash(mkdir:*) Bash(ls:*) Bash(pwd:*)
---

# Image Generation Skill (Claude Code CLI version)

When the user says "generate an image" or "draw one," execute the following steps:

1. Confirm the current working directory (pwd)
2. Create the output folder: mkdir -p ./images
3. Extract the image description and an English filename from the user's description
4. Call:
   codex exec -C "$(pwd)" -s workspace-write \
     --skip-git-repo-check \
     "Please use the image generation tool to generate: [description], save it as ./images/[filename].png"
5. ls to confirm the file, report the absolute path
The App version differs in that allowed-tools uses mcp__Control_your_Mac__osascript instead, running codex on your Mac via osascript, then copying the image back to Cowork outputs for your preview. The full content is in the zip’s gen-image-app/SKILL.md.
A few common key points: write the trigger words clearly in the description, so Claude knows when the user is calling it; narrow allowed-tools down to the necessary tools, to avoid accidental triggers; the step descriptions can just be written in human language.
Who is this method for? Who is it not for?
For:
- Users already accustomed to working inside Claude Code
- People who use both Claude and ChatGPT / OpenAI
- People who often need to produce article cover images, slide illustrations, product mockups, course assets
- People who want to turn AI tools into repeatable workflows, rather than manual operation every time
- People who want to start understanding how Claude Skill, MCP, and the local CLI chain together
Not really for:
- People who only occasionally generate one or two images (just use the ChatGPT web app)
- People who don’t want to touch the terminal at all
- People who have no need for image save locations, batch generation, or automation
Conclusion: not one more tool, but one less interruption
What’s truly valuable about this method isn’t “I’ve wired up yet another AI tool.”
It’s that it removes one interruption from the workflow.
Claude continues to be my brain, responsible for understanding requests, breaking down tasks, and organizing prompts. Codex CLI is my hands, responsible for getting OpenAI Image-2 running to generate images. Finally, the image drops straight into the project folder—no switching windows, no downloading, no moving files.
If you’re like me, using both Claude and ChatGPT, this is the smoothest integration approach I’ve found so far.
The subscription fees aren’t wasted, and the workflow gets shorter too.
I’ll keep documenting this kind of AI workflow implementation at paulkuo.tw: not just watching AI news, but actually stuffing Claude, Codex, Skill, MCP, knowledge management, and automation into daily work. If you’re also turning AI into your own second workbench, you’re welcome to come back and browse often.
The same codex bridge has an advanced use: let codex act as an independent reviewer, catching mistakes and giving a second opinion outside of Claude. I wrote up how here: I Had Codex Catch Claude’s Mistakes, But I Don’t Just Take Its Word for It.
💬 Comments
Loading...